30/01/2019

Like or Love for Helmar


Hey Everyone

My turn on the Helmar Blog today so make sure you check it out and see what everyone else has been up to while you're here
Also check out the Helmar store to see what other products the sell I'm sure they will have something you'll need and your local store will surely be able to get


I started off with sticking down the photo onto the Antique Vintage Ornate Frame from Memory Maze Laser Cuts using the Helmar Professional Acid Free Glue


Then using the Helmar Craft & Hobby PVA Glue I adhered the two piece of the frame together 


I painted some Dark Chocolate Impasto over the chipboard first then randomly painted some Rusty Paper paint by VIVA
While the rust paint was still wet I dabbed a little brown through it so it mixed then added a little Art Alchemy Patina Effect Blue Paste 


As you can see I used a lot of metal and I used the Helmar Premium Craft Glue to stick all the embellishments with


I then used some Art Alchemy Opal Magic Royal Robes Wax over the metal and a little on the chipboard just for a pop of colour


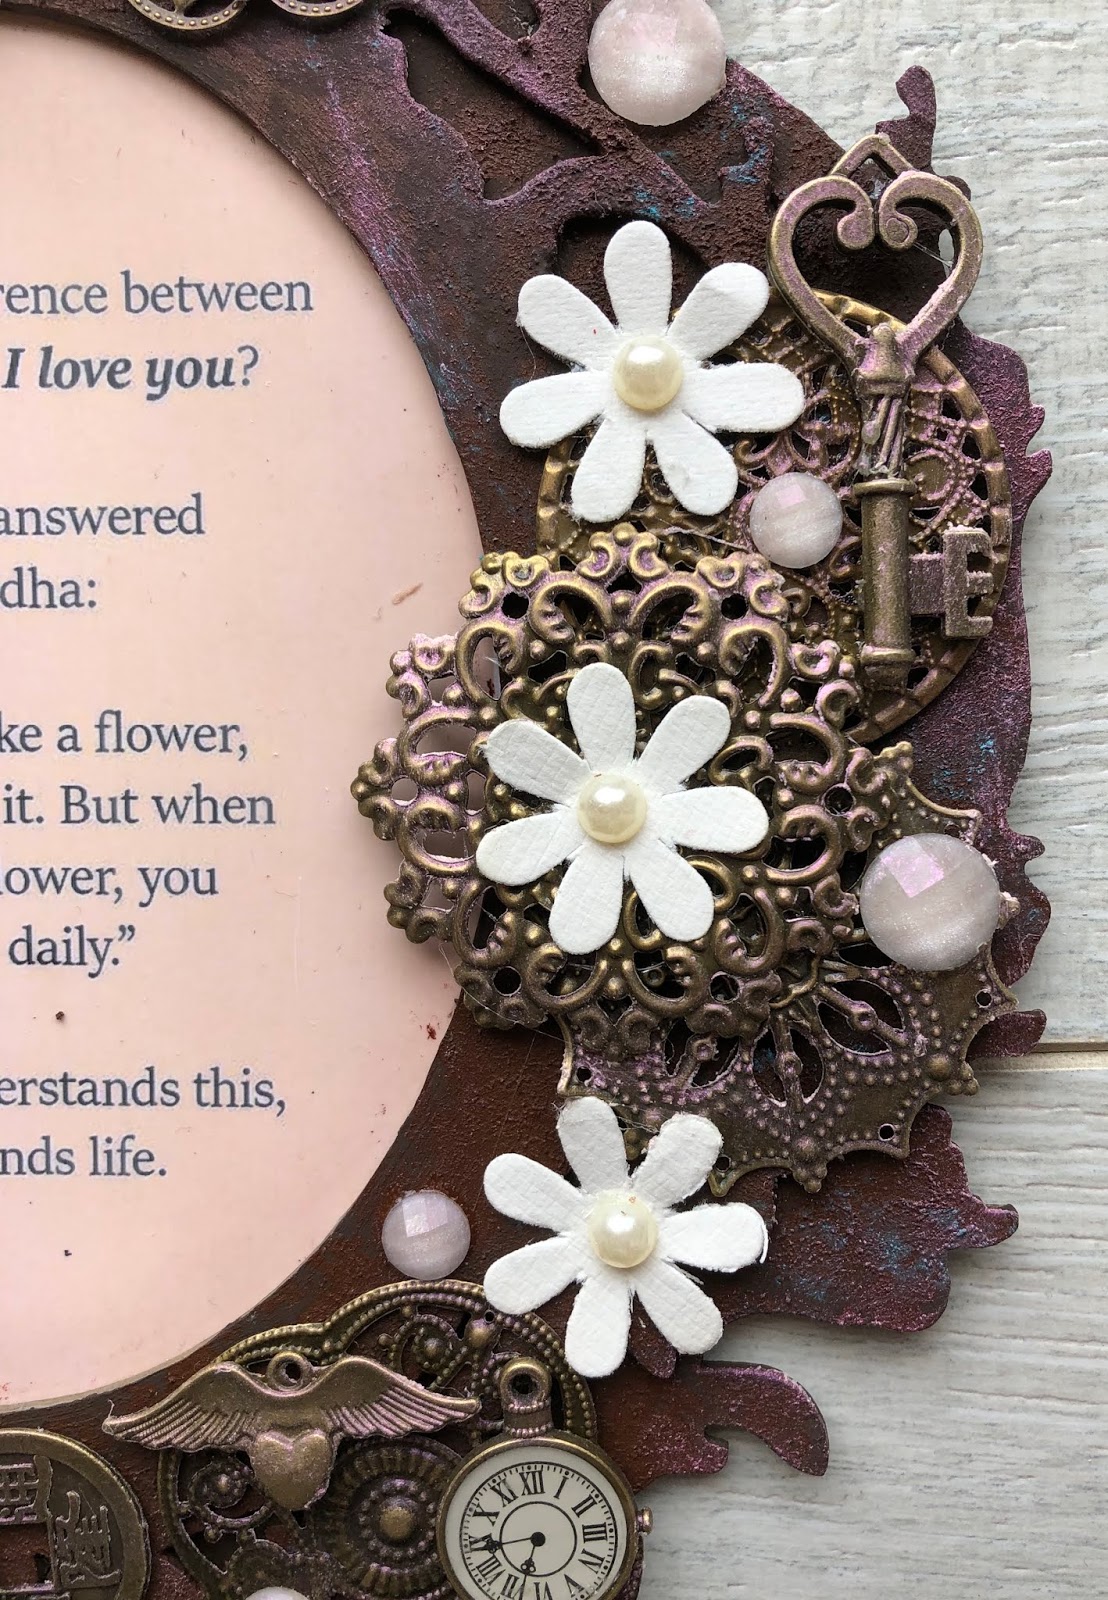
I added some Little Birdie Pearl Florettes (there always has to be flowers)


I used some Prima Say it in Crystals Lavender I used just the pink ones


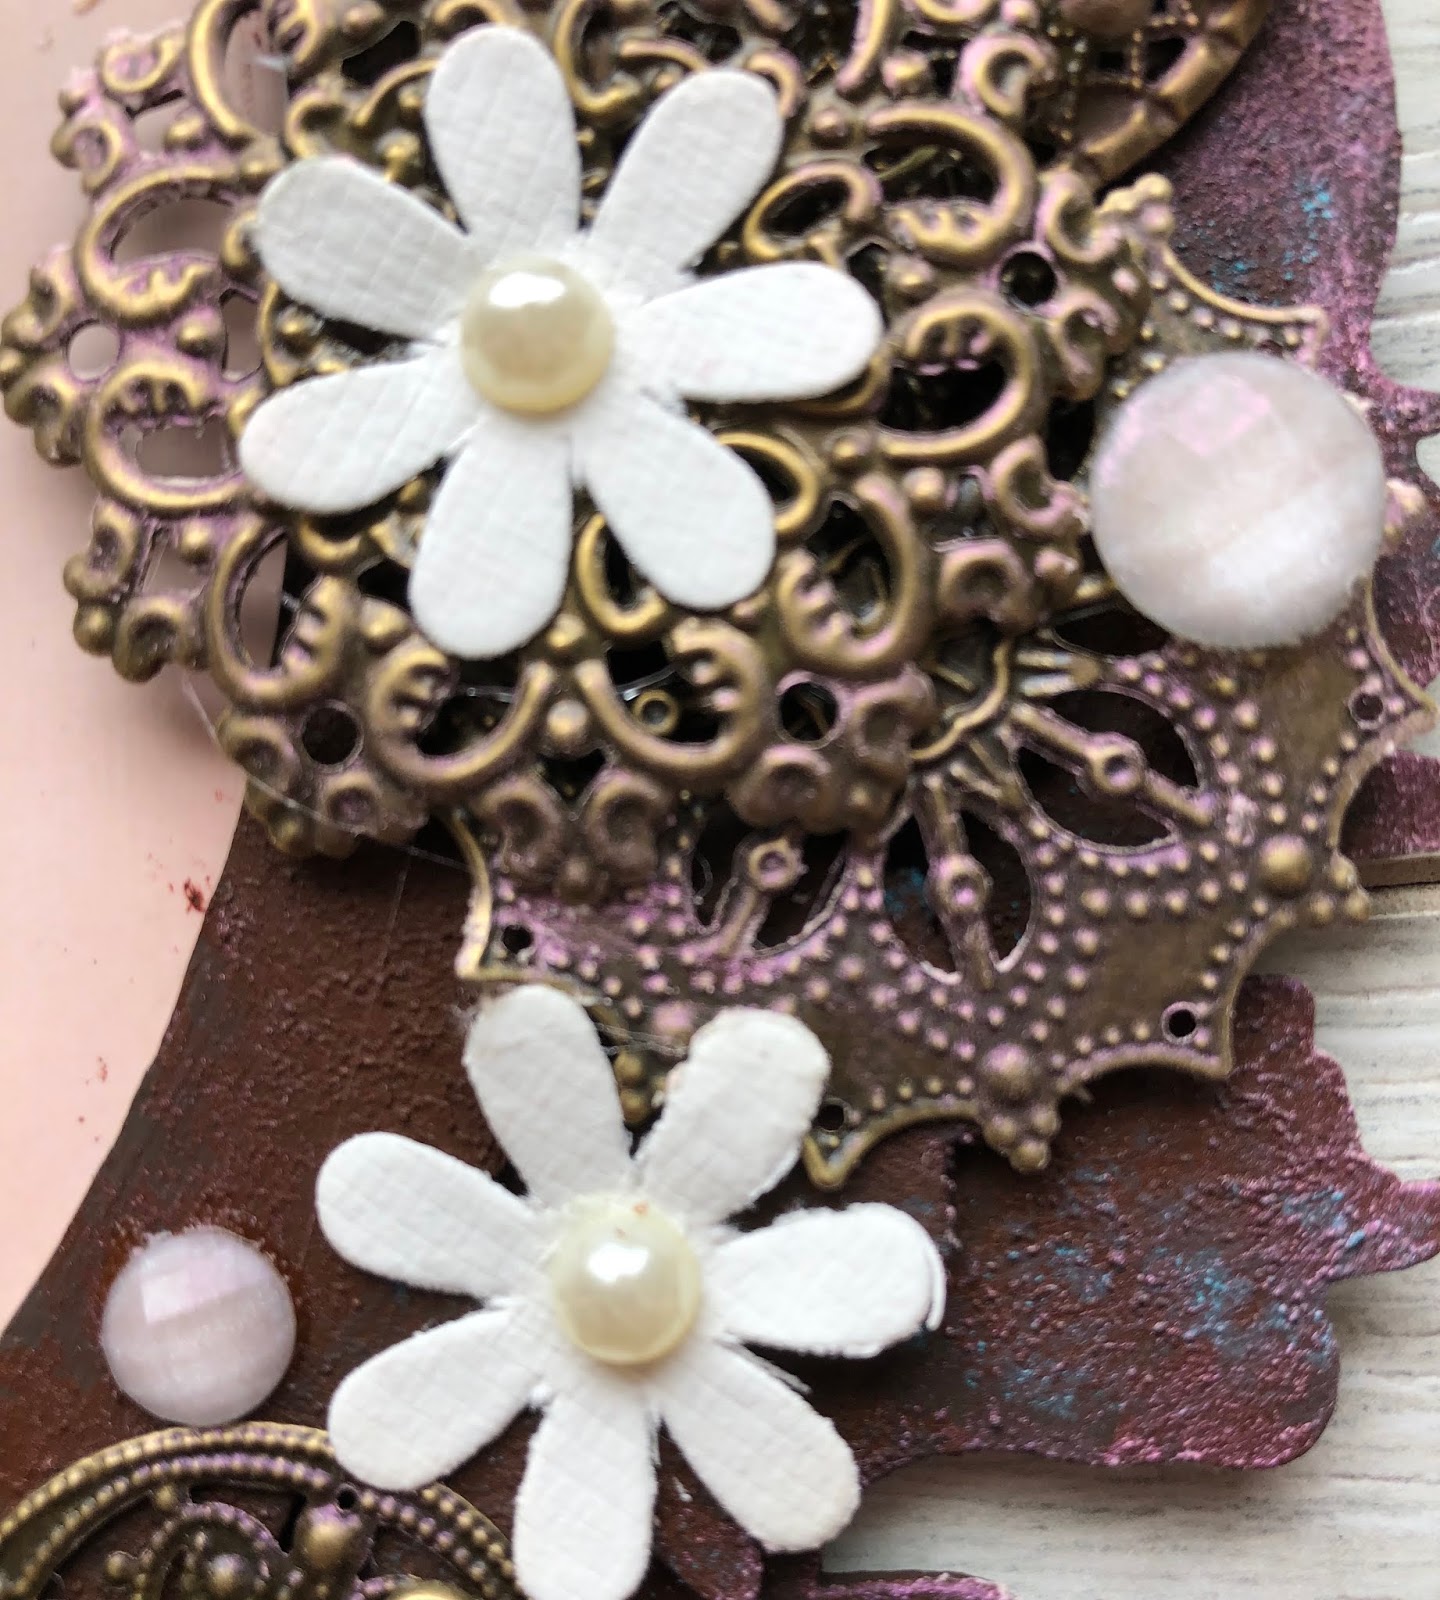
And to finish it off I added a glass cabochon 

Helmar Products I used


Thank you for visiting and I hope you will come visit again x

29/01/2019

Help for Memory Maze


Hey Everyone

My project for the Memory Maze Blog was created around the quote


Make sure you visit the Memory Maze Laser Cuts Store and see what's new 

And check the blog for all the latest inspiration the Team have created for you 


I had a timber frame and painted it with some Colour Blast Heavy White Gesso so that the Dylusions Paint in Cherry Pie


I used 3D Matte Gel through the Swirl Stencil onto some plain card once it was dry I painted that with Cherry Pie as well


When that was dry I scrapped some of the white gesso across the raised pattern so you could see it


I painted the Wrought Iron 22with some Art Alchemy Fresh Orange and glued it down with the Helmar Premium Craft Glue


With the Feather Flourishes I used the Art Alchemy Fresh Orange again and then glued them down with the Helmar Premium Craft Glue


I then added some flowers, a flair button and a journal card


Thank you for visiting and I hope you will visit again x

28/01/2019

Fly for Colour Blast


Hey Everyone

Here's a little project I did using the Colour Blast Colour Pastes 

Make sure you visit the Colour Blast Blog and see all the awesome creations from the Design Team and look out for all the new products that are coming out
And don't forget we have a Colour Blast Kit Club make sure to check that out as well


I started by using the Heavy White Gesso on this timber frame giving it a good coat


I used the Colour Paste in Sunshine, Tangerine Dream and Blush trying to blend each one after the other (not that successfully but I think it still looks good) through this flourish stencil


After the paste was dry I used the string to wrap around the frame in every angle I could go 


I painted some paper clay leaves with some Colour Shimmer Cube Apple of Eye (are no longer available but you might find some online stores still stock them)


I just got this Colour Spray Carribean and it's so nice- it has a matte finish but it still pops 
I sprayed it onto this paper clay filigree 
I love the way it was depth it went into the grooves and stayed darker
I then stuck the quote onto it 


Added a few different flowers I think then end one is Prima and the other two are Little Birdie Crafts
You can see the paper clay leaves sticking out of the sides of the flowers  


The butterfly was a photo I found on the internet and just loved it I printed it out then fussy cut around all the white it had
I folded the wings up so it looks like it was flying


I then glued the butterfly to a metal ring that has flowers all the way around


I love this flower from Little Birdie with the Smile cabochon in the middle so I made the butterfly fly to that and used some metal leaves off to the side
   

Thank you for visiting and I hope you come back soon x

26/01/2019

Gorgeous for Memory Maze


Hey everyone

This weeks project for Memory Maze Blog is a photo of my daughter and two of her besties having fun

Also don't forget to check out the rest of the Memory Maze Blog for inspiration and new products that come out quite regularly 


I painted the cardstock with black gesso
I used the Swirl Stencil on the background cardstock with 3D Matte Gel then covered it all with the gesso
I then went over the pattern with Art Alchemy Opal Magic Vintage Silk Wax


I painted the Fancy Frame with Art Alchemy Jade Impasto paint then used the 3D Matte Gel to give the frame a textured pattern 
Once the gel was dry I rubbed the Vintage Silk wax over the whole frame


On the chipboard word Gorgeous I used the Raspberry Pink Art Alchemy Impasto Paint for a pop of another colour
Added one of my favourite embellishments - a flair button


Behind the frame I put on of the Project Life cards I've had in my stash for ever and never got around to starting the album


The 3 metal flowers I painted with the Raspberry Pink Impasto then rubbed the Vintage Silk Wax and then added some crystals to the centres

Memory Maze products I used

and a chipboard word Gorgeous


Thank you for visiting and I hope you come back soon x

25/01/2019

Texture Challenge for Art and Soul Studio


Hey Everyone

This week is my turn to share my interpretation of the challenge over at Soul Sisters Facebook Page where each month we give away 3 vouchers of $50 - one for each category - layout, card or mixed media project so make sure you enter
Also don't for get to check out the rest of the blog for some great inspiration from the rest of the Design Team 


I used the Art-C Clipboard I seem to have a thing for clipboards at the moment I used the Heavy Body Gel through the Couture Creations Rosy Stencil
Once that dried I then painted the clipboard with the Art Alchemy Sparks - Unicorn Hair and Dragon's Eye
Then when they were dry I tried to use the Heavy Body Gel to even out the board so if you are to put paper on there it won't be lumpy to write on - it's still a little bumpy but I'm sure I can add a piece of cardboard on top if I use it


Ephemera Cardstock Dies has so many different pieces in them so I used a few here and there - a few feathers, a flower and a couple of tickets


I used one of the Journalling Notecards which I ended up cutting down a bit in the left corner and another for the feathers which is the little square
The Chipboard Stickers gives it a little dimension and I just love this little gold bee

I used some Art Ingredients Glass Beads in different parts on the Clipboard for some more texture


Products I used from the Art and Soul Store

Heavy Body Gel (check in store)
Art-C Clipboard
Couture Creations Rosy Stencil
Prima Midnight Garden -
Journalling Notecards
Ephemera Cardstock Dies
Chipboard Stickers
Art Alchemy Sparks - Unicorn Hair and Dragon's Eye
Art Ingredients Glass Beads
And some random Prima flowers I've had forever


Thank you for visiting I hope you come back soon x

18/01/2019

Family for Helmar


Hey Everyone

This week on the Helmar Blog I've created a canvas around this quote
It has such true words as our family is rather large because of the friends we have
Make sure you check out the Blog for great inspiration from the rest of the Design Team


I started off by using a Honeycomb stencil with modelling paste
Once the paste was dry I painted the canvas with black gesso 
While that was drying I painted the chipboard that I was going to use with some Art Alchemy Metallique Red Wine


Then on the background I used the Art Alchemy Metallique Gold Rush with a bit of water to thin it out 


I used the Super-Tac Glue to glue 2 pieces of cardboard together to raise the photo up
Then I used the Acid Free Glue to attach the photo to the cardboard


I used the Tacky Glue on the vellum spreading it out with my finger


Then to hold up the end that isn't on the photo I used the Liquid Scrap Dots which is great for the height without seeing it


I used the Premium Craft Glue to adhere all the chipboard and the flowers down


I used the Liquid Scrap Dots on half of the second heart raise it up a little as I was sticking it onto the other heart 


Thank you for visiting and I hope you come back soon x