24/03/2018

Shabby Chic Clock for Memory Maze


Hey Everyone

I created this Shabby Chic clock using the Vintage Bird Cage from the Memory Maze store (check with your local store and make sure they stock them)

Make sure you visit the Memory Maze Blog to get some inspiration from our Design Team

I created a YouTube video of the process so please give me a thumbs up and if you haven't subscribed please do I'd really appreciate it xx


I love shabby chic it's so feminine and pretty and of course i get to use flowers 


I used Ranger Oxides to paint the little flowers and leaves on the Prima frame just to give a little bit of colour 


Well I used Ranger Oxides to colour everything from metal to the stenciled heart on the background board 


Product I used -


The oxide colours I used were -

Tattered Rose
Squeezed Lemonade
Peeled Paint
Mermaid Lagoon

and the bird cage was coloured with White Gold Art Alchemy Wax

Thanks for visiting and I hope you will come back soon xx

22/03/2018

Adore for Mixed Media Supplies

Hi Everyone

How cute is this little Miss

Lucky for me Mixed Media Supplies have the perfect colour Mica Powder - Coral Reef it 
matches perfect with her outfit 


So I mixed the Coral Reef Mica Powder with some matte gel to put through the floral 
scroll stencil to give a nice vibrant pattern 


On the Adore I used the Shimmer Pearl Mica Powder it's so pretty and has so much shimmer 
to it I wish the photos could show it better


The other stencil I used texture paste and watered down the Mica Powder to make the 
pattern stand out and give the paper some colour 


Thanks for visiting and I hope you will come back soon xx

05/03/2018

Overcome for Colour Blast Challenge


Hey Everyone

I thought I'd enter the Colour Blast Challenge which is using texture and a Colour Blast product 
Lucky for me I love using texture on everything I do 

I have YouTube Video and it worked perfect this time no pixelation

I was given a canvas that someone was going to throw out because it wasn't working for them so they thought I might be able to use it

It sat in my pile of canvases for awhile and I tried to remove the timber products that had been stuck to it but man were they stuck, they ended up ripping the canvas


This was actually a good thing because I decided I liked the shaped of the frame of the timber underneath, so I took all of the canvas off, took the staples out and then filled in the gaps with modelling paste

Once everything was dry I used the Crafters Workshop Tiny Dots stencil over all the edges of the frame 

Then I used a mix of Peacock, Midnight and Lush Shimmer Dusts over the top mixing them up and painting them on randomly to give different colours and deepen the green of the lush and darken the Peacock as they were a bit too bright for the photo 


I glued some cardboard to the back of the frame and then added some Bling Colour Paste to the background I was using a stencil with it but the paste dried a bit before I used the stencil so when I lifted the stencil it didn't come up clean so I fixed it all and then stamped into it


Once it was dry I used the Midnight Shimmer Dust in some water and let it go into the grooves of the stamped area

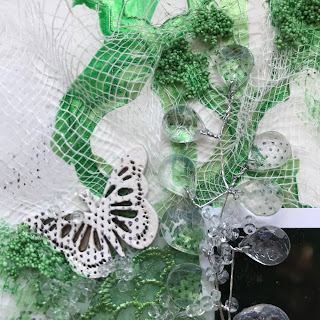
Then the fun part is the decorating I added a floral vine up the side with lots of little flowers and metal some of my favourite things to use then some seed beads for a bit of sparkle and that's it


Thanks for visiting I hope you will be back soon xx

Art is ... for Memory Maze

Hi everyone

I'm up on the Memory Maze Blog today

I found this round canvas and couldn't wait to use it 

I then saw this quote and things just fell into place


I also have the Dark Room Door border stamp - Art Studio also perfect

So I used the Nutty Overlay chipboard I felt it went great with the round canvas adding another dimension to it

I created a YouTube video of the process so make sure you check it out (I'm still trying to work out the issues but you can still see the process so please watch)

I have to say a HUGE thank you to Anna from Koko Vanilla Designs who helped my Mum make my stash of Inka Gold's grow so much LOL
(And thanks Mum for the growth of my stash it's nice having such a great choice of colours)

Make sure you check out Anna's STORE if she doesn't have something you are after make sure to message her and I'm sure she will do her best to help you out


This is a close up of the Nutty Overlay chipboard you can see Haematite a little in the background with the other colours over the top


I found a little paint palette embellishment in my stash and had to use it 
It was perfect 


You can see the embellishments that I covered in the Inka Gold's - the key in Rose Quartz, The ceiling rose in Cobaltblue and the metal circle with YellowGold 


Flutterby Design's Flair Button's are an awesome embellishment to slot in anywhere they have the best sayings on them I had to have a little bottle of magic on here because I believe each piece of art work you create hold a little magic


I liked the three little sentiments I chose and you can see the stamp underneath


In the centre of the stencil I used clear embossing powder to make the jar look as though it was glass


Here you can see the diamond stencil pattern
I used crackle paste with it but I must have
done it too thin as it didn't crackle at all 

Product I used


Thanks for visiting I hope you will be back soon xx

03/03/2018

Nan for White with 1 Challenge

Hi everyone 

White with 1 Challenge this month is really a challenge this month for me


For those that know me know how much green is not a colour I love very much, well some may even say I hate it lol (I've grown to like some shades over the last several years) but I won't go out of my way to use it lol 

This is a page for my Nan - the photo of her favourite flower and guess what - yes her favourite colour was green


I used a Memory Maze Chipboard word which I painted and stamped 
the background stencil is also from Memory Maze - Door Wire and then I used some 
Inka Gold Jade Green mixed with some water over the background 


My Nan used to crochet so I added a little crocheted flower 


Thank you for visiting and I hope you come back again soon xxx

p.s. I miss you everyday Nan xxx

01/03/2018

Gift box For Creative Artiste Mixed Media Challenges


Hi everyone 

This months sponsor is Hannah Oxberry over at the Creative Artiste Mixed Media Challenge Blog
Make sure you check out what the Team create and enter to win a great prize from our sponsor 
Be sure to visit her STORE and see what great products she stocks

I was given a candle for Christmas and the box was so nice and strong that I couldn't 
just let it go to waste so I gathered some of my stash and off I went

I used different Art Alchemy Waxes I love the look they give 
         
I layered different laces and muslin over it 
I also wound wire around the box for some more texture

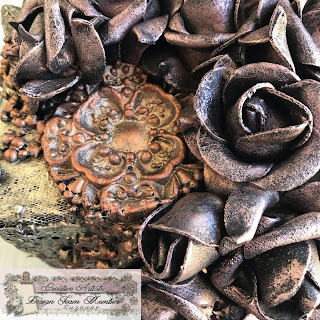
The flowers I used are a made of foam 

The wax gave the flowers a leather look  
I used some paper clay and art stones to embellish with as well they
I love the depth that the wax gave over the top of the gesso


And I used Prima Art Alchemy Wax colours I used are-

Rose Gold on the flowers
White Gold on the box
Rich Copper on the Paper Clay and Art Stones


Thanks for visiting I hope you will come back soon xxx