30/07/2018

Choose to Shine for White with 1


Hey Everyone

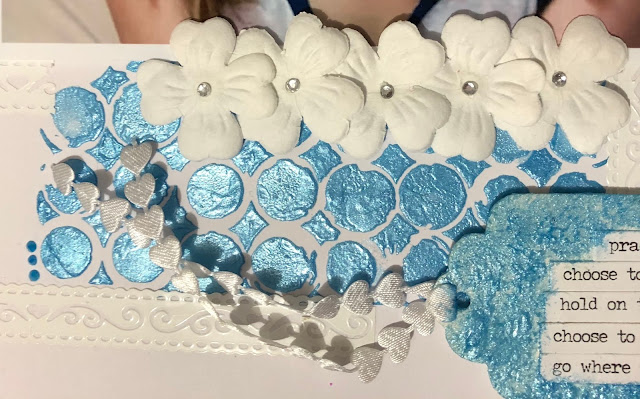
Here's a layout I did for the challenge over at White with 1 this month's colour is Air Bubble


I used some Colour Blast Colour Paste Singin the Blues with a Tim Holtz Stencil 


I used paper flowers, some paper tape and some Kingfisher Liquid Drops 


I used some transparency pieces I had to embellish with


I then used a cardboard tag and used some Tim Holtz Small Talk Stickers, once they were stuck down I used the Colour Paste to dab it onto the tag to add some dimension and colour to it


Thank you for visiting and I hope you will come back soon x


28/07/2018

Flowerpot Frame for Memory Maze


Hey Everyone

This project was lots of fun

A friend was getting rid of a few old craft bits she had and thought of me so I was the lucky recipient of some half terracotta pots, some straw and a few other things that will get used at some stage I'm sure

This project I used the Thistle Flowers and Flourish Corner Set from Memory Maze
Make sure you check out the Blog to see what great creations the Design Team create with the fantastic products Memory Maze make

I made a YouTube Video of the process so make sure you take a look and give me thumbs up and subscribe to my channel x


The back of the frame I covered with tissue paper using a couple of layers to give a bit of depth
I glued the pot to the frame with Helmar Super-Tac Glue as this glue hold just about anything  

I painted the frame and the pot with white gesso then made a mix of water and Colour Blast Colour Shimmer Dust Midnight 
After the Colour Shimmer Dust Midnight dried I used the Colour Clear Shimmer Brush Marker I dripped a couple of drops onto another brush so I didn't get any colour onto the Colour Clear Shimmer Brush Marker I love sparkle the more the better


I painted the medium flourish from the Memory Maze Flourish Corner Set with the Colour Mica Powder Watermelon and clear gesso


I used some Helmar Scrap Dots glue to raise the  Thistle Flowers off the back of the frame to add some dimension to the project I also used some Helmar Tacky Craft glue


I gave the whole project two coats of the Helmar Crystal Kote Gloss Varnish to give a nice shine to everything and a bit of protection from dust


Memory Maze products I used -


Thank you for visiting I hope you come back again soon xx

13/07/2018

Paint for Helmar


Hey Everyone 

I'm here on the Helmar blog to share a project I created using their glues and you will see I use quite a few different ones each for a different reason

I used a piece of cardboard to create this project I didn't have a canvas that suited what I wanted and I have large stash of cardboard cut off's just incase (I also use it to raise my photos and other things up on my projects)

So I started off by scrapping a layer of white gesso across the cardboard which gave a great texture because of the grooves in the board


I used some Prima Marketing Inc Metallic Accents Pastels watercolour paints to drip down the board
I also painted the brush stencil to make it look like thats what painted the board and the word PAINT


Whenever I glue a photo to anything I always use the Acid Free Glue so I know the photo is always going to be safe 
Then to stick the boards together I used the Super-Tac Glue I know this will hold them together well


Here I had used a stencil of a jar with some modelling paste and painted a mix of the colours I'd used and a bit of grey to make it look like paint water 
I wanted the jar to look like glass so I used the Premium Craft Glue as it dries clear and gave it the look I wanted


I used the Tacky Craft Glue or the Super-Tac Glue to add to my micro beads and Art Stones I like these as they are flexible glues and they dry clear and don't take away the colour from the micro beads like some of the other glues do


Liquid Scrap Dots is awesome for adding dimension to thin things  like these letters that need height  either side as the middle has been stuck to the arrow but the top and bottom of the letters need be stuck down too and because they are narrow it makes it hard to use anything else


Here I added a few little embellishments including a small brush, a jar that I added some bronze spray too and a Flutteryby Designs Flair Button too


The word stickers are from one of Tim Holtz's sticker books and the hearts are from a Kaisercraft sticker sheet I have had for awhile


The chipboard thistle flowers are from Memory Maze and I stamped them with a tiny dot stamp which I also used randomly stamped around various places


The arrow under the word Paint is also from Memory Maze and is part of the Boho Deer Skull with Feathers Set


Here are all the glues I used and you can find them at most of your local stores or on the Helmar site


Thank you for visiting and I hope you will come back soon xx


10/07/2018

Picture Perfect for Memory Maze

Hey Everyone

My turn on the Memory Maze Blog so make sure you stop by and check out the other Design Team members creations and see what else is happening with the latest creation of Chipboard and other awesome products or check out the Facebook page 


Today I created a frame with a picture of girl from a magazine which I fussy cut out and decorated it with a few bits and pieces from my stash just for something different


I painted the frame with black gesso then with some graphite texture paste I used the Door Wire Stencil over the background of the frame (I took the glass out and put that aside as I don't use that)


I then used some Linda's Magical Shakers - Alpine Ice Rose, Grab a Guy GoldCowabunga Copper and I added a little bit of the Creme Brûlée Cream from the Sweet Treat Shimmer Set but I wasn't happy with that so that got covered up


I used the 2nd largest flourish from the Flourish Corner Set and covered it with Finnabair Art Alchemy Antique Brilliance Red Amber Wax and wasn't happy with it so I then went over it with some Metallique Rose Gold Wax 
I also used the Metallique Rose Gold Wax over some of the metal embellishments

With the magazine lady I liked the way her hair was styled except there was writing in it so I went over it with some brown paint and tried to follow the way it was styled with the brown paint
Then when I was glueing her down I added a bit of tissue under her hair to give it some dimension
I glued the flourish to her hair like a tiara and added a metal embellishment and some pearls


I then added my embellishments to the corners of the frame a few metal pieces a couple of velum flowers, a flower that I have had forever and it was perfect with the rose gold flourish that I used on her hair


I gave her a drop pearl and diamond earring


When I was happy with everything I added the Colour Blast Clear Shimmer Brush Marker to her face so she has a gorgeous shimmer to her


I also added it to the vellum flowers and butterfly - it gave them a more transparent look

Memory Maze Products I used -


Thank you for visiting and I hope you come back soon xx

06/07/2018

Bird Cage for Creative Artiste Mixed Media Challenge

Hey Everyone

This month at Creative Artiste Mixed Media Challenges we have Tando Creative as our Sponsors they have such a huge range of products make sure you check out their site

And be sure to check out our BLOG for some Design Team inspiration and enter to win One of two discount prizes of 30% off 


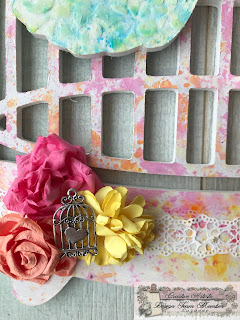
I love bird cages and was given this timber one which is from KaiserCraft I think it's been around awhile but I'm sure if you wanted one you'd still find it somewhere


I used Tim Holtz Distress Oxides - Picked Raspberry, Carved Pumpkin and Fossilized Amber on the cage and Cracked Pistachio, Mermaid Lagoon, and Peacock Feathers on the bird


I used a floral stencil over the top of the inks which makes the colours look different again 


I added some lace ribbon tape across the bottom and a couple of flowers and a cute little bird cage charm I had


I used a paperclay ceiling rose and added a pearl and bling button to the middle with a few flowers a crystal droplet and a yellow heart for a pop  
In the metal charm I added little bling using Helmar Gemstone Glue to make sure they stay in place

Thank you for visiting and I hope you come back soon xx 

02/07/2018

Meant to be for Memory Maze

Hey Everyone

Here's my latest creation for the Memory Maze blog
Make sure you check out the Blog and the Facebook page fore everything that's new and up and coming 


I love the Green Grunge stencils that Memory Maze make and they have so many different ones the one I used -Grunge Stencil 3 has the flowers, the circles and then a few bits of greenery 


I used texture paste on the background of the canvas which was the perfect size for the stencil


I used Lindy's Magical Shakers - Grab a Guy Gold, Black Forest Black, Magnolia Magenta Gold, and Autumn Maple Crimson over the background layering each colour until I was happy with the background I had


I used the Hexagon Grunge Stamp and the Circle Stamp randomly over the canvas including the edges


Here you can see chipboard flowers these are from the  Sweet & Sassy Chipboard set and I covered them with Orange Inka Gold for an extra pop I also rubbed the orange over the corners of the canvas and the top of the stencilled area
I also used a vintage frame under the photo


I used a couple of cogs from the Bike, Cogs, Clocks, Moustache and some from the 12 x 12 All there is is Cogs I love that they both have different cogs in them

I added some flowers to soften the canvas a little and some micro beads for extra texture


Products I used from Memory Maze


sorry no picture


Thanks for visiting I hope you come back soon xx